Welcome to Gaia! ::

Was this helpful?

Yes, totally <3 0.42650602409639 42.7% [ 177 ]
Nope 0.13012048192771 13.0% [ 54 ]
I'm a weirdly place poll whore~ 0.4433734939759 44.3% [ 184 ]
Total Votes:[ 415 ]
1 2 3 ... 9 10 11 >

User Image - Blocked by "Display Image" Settings. Click to show.


Obviously, some people are going to need a guide for this, so I thought I'd make one.

The admins are probably going to be updating it with more features, so it may not be actually finished for some time.

Any help you could give me would be greatly appreciated, just post in the thread.

ToC

  1. Hellos and such
  2. Updates
  3. Getting started and Background
  4. Content
  5. Editting the content sections
  6. Using Avatar, Picture, Caption, and Text
  7. CSS
  8. Things to know and Q&A (FAQ)
  9. Thanks yous
  10. Links to other profile places
  11. Reserved
Updates


  • Jul 11, 2006 : Profiles 2.0 is released
  • Jul 12, 2006 : Thread is made
  • Jul 23, 2006 : Custom sections are found. o_o How come no one told me sooner? emo
  • Aug 1? 2006 : CSS compatable with 2.0 profiles. surprised
  • Aug 24, 2006 : Finally starts updating! sweatdrop
  • Nov 13, 2006 : Start updating for real! lol
  • Aug 25, 2007: Well, I just taking down the code section~ When I made this guide, it wasn't specifically for coding, it was for the basic basic stuff. Coding wasn't even available yet. And there are a few other coding guides out there for 2.0 profiles, better than I could dream to make~ I'll put a few in the ex-CSS post. 3nodding
Getting Started


To make a profile, you have to know how to edit it, right? xD First of all, you have to have the correct profile type. Scroll over "my account" on the header, and click "account."

User Image - Blocked by "Display Image" Settings. Click to show.


Scroll down to the bottom of the "account" section, and the last drop box should be a choice of profile type. To use 2.0, change it to "Current."

User Image - Blocked by "Display Image" Settings. Click to show.


To edit your profile, go to the profile screen again and click "View Profile." At the top right, next to Log Out, there should be a link to edit your profile. Click it, and a toolbar should appear in the lower right corner. That's what you'll use to add and change most things on your profile. I'm going to focus on what you can do with each of the six buttons.


Background


User Image - Blocked by "Display Image" Settings. Click to show.The background is obviously a picture that's in the very back. If you don't use codes to do this, then the picture will just repeat endlessly. To set a background, hit the theme button on the toolbar (The one circled on the right). After you do, the box below should appear in the top left corner of your screen.

Ways to add a picture:

Gallery:
The section that opens up right when you open this up is the gallery. Gallery has a number of pre-made pictures that you can use. Click the picture, then the update button and it will appear.

Photobucket:
For this to work, you must have a photobucket account.

User Image - Blocked by "Display Image" Settings. Click to show.
First sign into photobucket.
Then a group of six of your pictures from photobucket will appear. You can also scroll through the rest of your pictures, or upload one from your computer. Once you find the picture that you would like to use, click it and "Paste Image." The url of the picture should appear in the box above the add button. Then just hit add and it should appear on your screen.

URL:
Finally, the easiest way to get in a background is by using the url option. This allows you to pick a picture from anywhere and put it as your background. Just take the picture url, stick it in the box and hit update.


I'll get to CSS in a later post, so just wait for that.
Content


User Image - Blocked by "Display Image" Settings. Click to show.Hitting the content button on the toolbar will bring up the following window:

User Image - Blocked by "Display Image" Settings. Click to show.


Clicking the add button will add whichever content section you chose to the top of the first column. Here are some short descriptions of what the sections are:

Details: Shows your avatar and some miscellanious facts about you and your account.
Equipped List: Shows the items that you're currently wearing.
Interests: Shows the interests that you've put into the interest section of the profile.
Contact: Links to add as a friend, pm, trade and add you to people's ignored lists.
Store: A link to your store in the market place (should you have one) along with the description you have for it.
Guilds: A link to a list of the guilds that you are in.
Forums: Shows your post count, average amount of posts per day, and a link to your latest posts.
House: A small picture of your house in towns, considering you've set one up.
Wish List: Shows the items that you'd like to get.
About: Whatever you'd like to say about anything.
Journal: A link to see your journal and links to several of your latest journal posts.
Friends: Shows ten of your friends.
Media: A movie or song that you've placed into your profile.
Comments: A place for people to comment on you or your profile or anything else without having to pm you.
Signature: Your signature, obviously.
Custom Sections: Put in another about section, basically, but you can only edit it in the "Edit my profile" option.

You can take out any of the sections by using the x next to the edit button on the far right of the section header. You can also add any section back by clicking the content button on the toolbar and clicking add under the name of the section you'd like to add.
Editting and moving content sections


Right now there isn't much that you can change about the content sections, but hopefully the admin's will let us change more things about them soon.

Here's a list of things you can change about sections using the edit button on the top right of the header:

Details :
  • Name

Equipped List :
  • Name

Interests :
  • Name

Contact :
  • Name

Store :
  • Name

Guilds :
  • Name

Forums :
  • Name

House :
  • Name

Wish List :
  • Name

About :
  • Name
  • The content

Journal :
  • Name

Friends :
  • Name
  • Size of friend's avatars (Head-Regular/Link-Minimal)

Media :
  • Name
  • Content

Comments :
  • Name
  • Size of commenter's avatars (Head-Regular/Link-Minimal)

Signature :
  • Name

Custom Sections :
  • Name
  • Content


Yup. That's definently not a lot. While that's all that you can change while in the actual profile editing page, you can also change the content of certain things on the profile page. Some things cannot be changed there, such as the shop section and the house.

Moving Content Sections


When moving the sections, you can only move them within the three columns. Yes, three, for those of you who can only see the two on the left.
Hopefully, like many other things, you'll be able to move them wherever you want. Right now though, you're restricted to three columns.

Tips to help when moving:
Make sure there's a line under the section that will be on top of the section you're moving. It may be a little hard to see, but if the line isn't there it'll just get moved back where it was before.


I don't know how to get the third column myself, as my screen is too small (1024 by 768 pixel dimension). If you could tell me how to do it, it would be greatly appreciated.
Using Avatar, Picture, Caption, and Text


User Image - Blocked by "Display Image" Settings. Click to show.Avatar

The avatar option lets you add an avatar of a friend or other user to your profile.

Adding:

To add someone on your friendslist click "Friends" then scroll down until you see their name. Highlight their name, and click add. They should appear in the top left corner of the window.

To add someone who is not on your friendslist, click "Username" then type their name into the box and click add. They should also appear at the top of the window.

After you get the avatar on the screen, just drag and drop it to wherever you want it to be.

Options

After you add the user to your profile, there are a few things you can do.

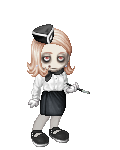
One of the things is that you can change the size of their avatar. There are three sizes, head, bust, and body, shown in the picture below.
User Image - Blocked by "Display Image" Settings. Click to show.

To change the size, click "Edit" on the small grey bar above the avatar, and change the first drop box to the size you want the avatar to be.

Another thing is resizing the avatar. It wont necisarilly stay in the form it's supposed to, you can stretch it out, make it taller, make it shorter, fatter, skinnier, all of that kind of stuff. There's no way to change it back to a size that it was before, so be careful. If you want it to start back at the default size then delete the re-sized version and add the avatar again.

You may also change the way the avatar is facing. To change that, click "Edit" again, and change the second drop box to the direction you want them to face.


User Image - Blocked by "Display Image" Settings. Click to show.Caption

This adds a caption (or a word bubble) to your profile. You can move them anywhere around your profile. They are not BBCode supported. Obviously, to make one of these just type in what you'd like to have in the word bubble, and click "Add."

To change what's in the bubble, click "Edit" and add onto or change what's in the box.
To delete the bubble click the x next to edit.


User Image - Blocked by "Display Image" Settings. Click to show.Picture

Adding pictures to your profile is somewhat like adding avatars and doing background. There are four choices here, like the background, but instead of CSS this window will have wishlist. Gallery, Photobucket and URL are the same, but if you need a reminder as to what they are go back to the background post.

Wishlist is new though. This is nice for questers who want to show which items they still need. When you hit the wishlist link, all the items on your wishlist should come up. Just click the add button below the item you want and it should appear on your screen.

Now, once you've gotten the picture you want onto the profile, all you have to do is drag and drop it to wherever you want it.

Caution: When using pictures, even if you've saved them as a .gif file (See Q&A as to why) the entire picture will cover the profile. You cannot use links that the picture is covering, you cannot heighlight words when part of a picture is over them. Remember this when you put pictures on top of the "edit my profile" and "log out" links, because when you go to view your profile you wont be able to edit it.

There is a way to edit it again though, you just need to use the link to edit your profile. I'll get that up in a bit.


User Image - Blocked by "Display Image" Settings. Click to show.Text

Text is basically the caption, except without the talk bubble and it supports BBCode. Just type what you want into the box and click add.

To change the text just hit "edit," to delete it just hit the x next to edit. When you have what you want, just drag it and drop it where you want.

Another way you could use this is to make linked pictures. Since it supports BBCode, you just have to use the User Image - Blocked by "Display Image" Settings. Click to show.
Aug 25, 2007: Well, I took down the code section~ When I made this guide, it wasn't specifically for coding, it was for the basic basic stuff. Coding wasn't even available yet. And there are a few other coding guides out there for 2.0 profiles, better than I could dream to make~ Here are a few of those.

Things to know


Just like with the old profiles, if you're moving things around in one browser it might not look the same in another.


Q&A/FAQ


Q: Why is there a lot of white space around the picture I added to my profile?
A: Because that's part of the picture. To take that out you have to have a program that has layers I believe and take out the white sections, or the sections you want to be transparent, and save the picture as a .gif.
Thank yous


Thank you to the admins, who made the profiles of course.
TheVampireNeko: Reminded me to post something about browser differences.
Katanami: Reminded me about the alternate photobucket trick.
Links to other profile places

User Image - Blocked by "Display Image" Settings. Click to show.

User Image

User Image - Blocked by "Display Image" Settings. Click to show.
User Image
User Image - Blocked by "Display Image" Settings. Click to show.

User Image - Blocked by "Display Image" Settings. Click to show.


Peloidra Shakai's Ace of Spades Awards
PD Mafia
-The Profile Police-
An All Out CSS Guide // Customizing Old School Layouts smile
Play your own music in your profile!
{HxC Ratings}
Version 2.0 CSS guide
[Advanced Guide] Translating between Old School and v2

Want to link me?

User Image
By Kykeon
[url=http://tinyurl.com/2f3hnq][IMG]http://i119.photobucket.com/albums/o140/kyk-bucket/profiles2-tiny.png[/IMG][/url]


User Image - Blocked by "Display Image" Settings. Click to show.

[url=http://tinyurl.com/2f3hnq] [img]http://i9.tinypic.com/47ccwut.png[/img][/url]


User Image
By Dhum

[url=http://tinyurl.com/2f3hnq] [img]http://img.photobucket.com/albums/v240/dhum/my%20work/PROFILES2.jpg[/img] [/url]


User Image

[url=http://tinyurl.com/2f3hnq] [img]http://i7.photobucket.com/albums/y282/songstress-yuna37/2.png[/img] [/url]
Now that you read through all that, you can finally

get started on your profile!
How nice of you to make this guide. <3
*pokupokuAra*
This should totally be sticked.


Edit:
1st page whee

Quick Reply

Submit
Manage Your Items
Other Stuff
Get GCash
Offers
Get Items
More Items
Where Everyone Hangs Out
Other Community Areas
Virtual Spaces
Fun Stuff
Gaia's Games
Mini-Games
Play with GCash
Play with Platinum
//
//

Join Now

// //

Have an account? Login Now!

//
//