Welcome to Gaia! ::

Reply Old art info threads I decided to keep since alot of work went into them :-)
PSP - Shading Templates a la Andi and Terrenity

Quick Reply

Enter both words below, separated by a space:

Can't read the text? Click here

Submit

Kiwi Squirt Bottle

Tipsy Enabler

PostPosted: Tue Jan 17, 2006 10:38 pm


.... As pulled from the thread of similar name in the main forum.... xd
Just thought it'd be nice to shove 'em in here as they were both done with PSP.
PostPosted: Tue Jan 17, 2006 10:40 pm


Andanielle

Okay, Andi's had a bit of sleep, so let's see if she do this correctly. whee

(note: this lineart was part of the Sun Children SS guest colourist event, done by WinterFalcon, shop (c) Nayo-Chan.
This was used for one of my submissions, that is all. whee )


Let's say you have this lovely lineart.
And you want to colour it.
This is good, you can colour it.
User Image
(This is just a quick, flat colouring of what I think it might look like at the end.)
But instead of using the didge/burn tool or the lighten/darken tool directly on the layer you coloured toshade, instead add a new layer.
A multiply layer. And shade in shades of black.
Shade it how you want.
make it look nice and pretty.
User Image
(with shading and flat colours)

And if you took it down to just the shading and my normal white background layer (which is there usually only for my own sanity biggrin ) it'd look like this.
User Image

Yes, I know there are a lot of other layers there, but ignore them.
The ones I want to point out I highlighted in yellow.
Those are my shading layers.
The one on top is a nice, overall basic :everything is 3Dish so I wanna give it all sorts rounded edges.
The one below deals more with how the light falls... Or doesn't fall in some cases.
Use as many layers as you want to get your shading done.
Just do it all in black for now (you can change it to different colours later).
And I would recomend merging as many as possible to make it easier on you later on.

Now save your file as a .pspimage, or .psd, or whatever file type it is for your program that saves it with all the seperate layers.

Now guess what?
You just made a shading template.
biggrin
You can always come back to this file and colour away, then just save it as a different name.

And this is my finished product!
Yes, I did change him from a psuedo-superman theme to a more wintery one, as that was the reason I was colouring him - as an SS thingie.
User Image
(and here you can see the highlighting better... Same template, different colouring. >w<
http://i6.photobucket.com/albums/y246/Andanielle/male_andi2.png )

Now you may be staring at him, then at my shading templates, and realise something...
Hey, he has highlights!
And there's no white on those templates! surprised
(For one thing, white on a multiply layer just doesn't show up.)
BUT!
If you use whites of various opacties and transparancies and whatnot, you can highlight too, just don't set the layer to multiply.

Once you figure it out, it's really not that hard.

(And if you wanna change the colour of the shading, like I did as black never really occurs naturally, then lock the shading layer's transparancy and colour over it with a brush in the colour you want.)

If you have questions still (about how to make templates, NOT about how to shode whee ) just let me know, either by posting, PMing, or IMing via MSN.


Terrenity
*claps* Nice tutorial, Andi!
I suppose I'll put in my two cents as well, since I wrote a shading template tutorial for a friend last weekend.
Apologies for the picture sizes and cruddy quality. sweatdrop
Lineart is copyright Grey Dragon. Screencaps copyright Terrenity. Tutorial may be reproduced/quoted with credit.

Terrenity
I'm going to use some free lineart from Dark Turret Dragons, courtesy of Grey Dragon, for this, since it's small and simple. Lines are copyright Grey Dragon.

For reference, I started with this. It's shown with the white background erased for coloring.
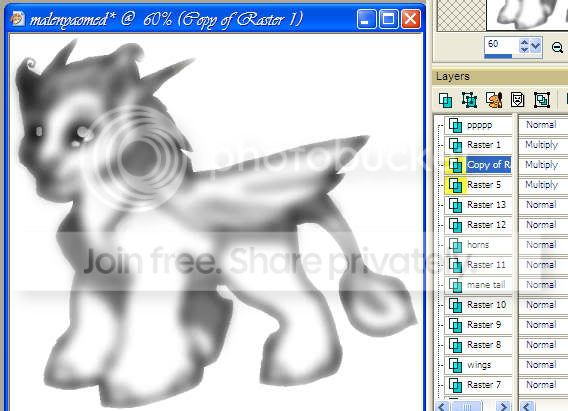
The next step is to fill the area in the lines with a medium grey. I use the magic wand tool to select the lines so I don't have to erase later. The grey should be on a layer underneath the lines. Once it's filled, you can shade the grey as you would if it were colored. I like to use the lighten/darken tool. Congratulations, you now have a shading template. 3nodding

Now to use the template: It is easiest to decide what type of transparency to use when the pet is colored, so I'd recommend creating a new layer under the shading, hiding the shading layer, and at least filling the pet with a medium color. Once that's done, unhide the shading layer. You need to set the transparency on the layer - there are a lot of options, at least in PSP, so I'll briefly cover the most useful ones. I don't know how to do it in PS, but in PSP there is a drop down list in the layer menu where you can pick.
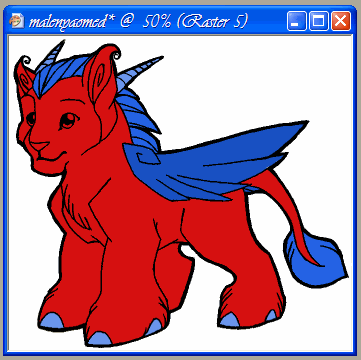
For reference, this is the unshaded coloring I did. I didn't do the erasing around the lines very well, as you'll see, but it was a quick job.

Opacity Change is actually not accessed through the transparency menu. Just adjust the opacity of the layer. I used the slider. This technique is fairly effective, although it tends to grey the colors.

Screen tends to look a bit grainy on large pieces, but it works just fine on small ones, although it lightens the color considerably.

Multiply is a good all-around setting. It darkens the color considerably, but it works great otherwise. Additionally, I /know/ that PS has this function.

Luminance is another good setting, although it looks odd with some brighter colors. It usually heightens contrast between light and shadow.

Finally, overlay is my favorite. It looks great on anything and is true both to color and to depth of shading. It's basically the only one I use.

Troubleshooting and other stuff:
You must have the shading layer on top of all the color for it to work.
Transparency can also be applied to lineart to make colored lines.
Some coloring jobs might require different transparencies for the shading than others.
An interesting effect can be achieved by putting the shading on the bottom and the coloring on top, and making the color transparent instead of the shading.
Multiple layers under the shading layer will be shaded as though they are one layer.

And that's the end. biggrin

Kiwi Squirt Bottle

Tipsy Enabler

Reply
Old art info threads I decided to keep since alot of work went into them :-)

 
Manage Your Items
Other Stuff
Get GCash
Offers
Get Items
More Items
Where Everyone Hangs Out
Other Community Areas
Virtual Spaces
Fun Stuff
Gaia's Games
Mini-Games
Play with GCash
Play with Platinum
//
//

// //

Have an account? Login Now!

//
//