Welcome to Gaia! ::

Reply The Origami Guild
[Model] Paper Crane (2)

Quick Reply

Enter both words below, separated by a space:

Can't read the text? Click here

Submit

Iyou
Captain

PostPosted: Tue Nov 13, 2007 8:38 am


Crane

User Image

Difficulty: 2 (A few folds some beginners may find difficult.)
Paper Type: Square. Most sizes and thicknesses work.
Sheets: 1
Cuts/Glue: No
Time: Less than 5 minutes

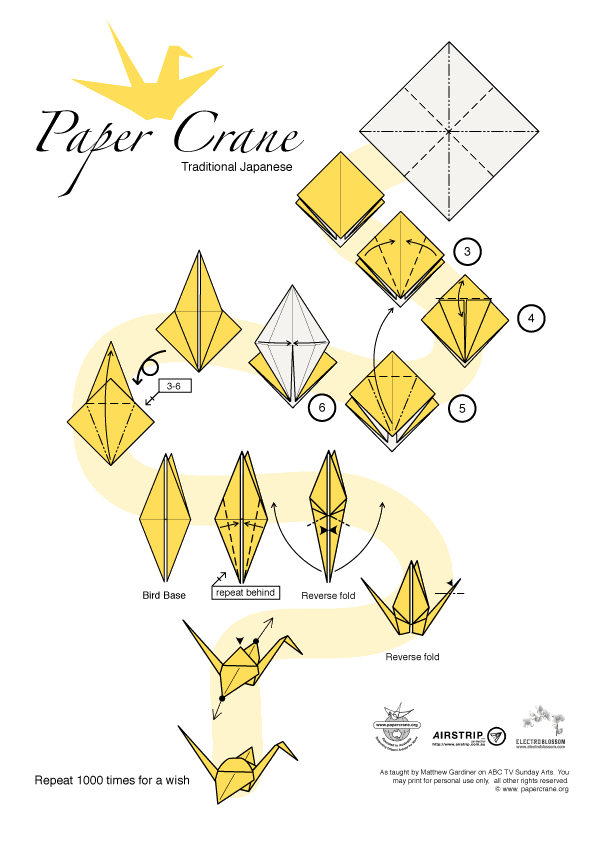
Source: Instruction diagram courtesy of Papercrane.org

Instructions:
Ah, the paper crane. No self-respecting connoisseir of origami would be without the knowledge of how to make one of these. It is said that if you fold 1000 paper cranes, you'll be granted a wish. This model is also known as the peace crane, and millions of them are sent each year to the atomic bomb memorial in Hiroshima, Japan.
User Image

For beginning folders who find the above diagram to be unclear, I've assembled a series of photos in the next post which will hopefully help clear up any confusion.
PostPosted: Tue Nov 13, 2007 12:48 pm


Don't be confused by my fingers if they look like they aren't doing anything in a few of the photographs. The model was hard to keep flat on my desk the entire time, so in some of them my hands are in the photo just to keep the paper flat. sweatdrop

User Image

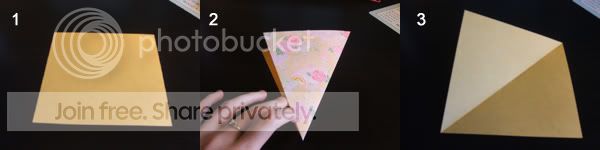
1. Begin with a square piece of paper.
2. Grab a corner of the paper and fold it over to touch the corner diagonal to it. (Be careful to keep the edges lined up and fold neatly! These first few steps are where 90% of beginners make their mistakes.) Use your nail to flatten the crease.
3. Unfold the paper. It'll help you later if you crease this fold in the opposite direction, but isn't necessary.

User Image

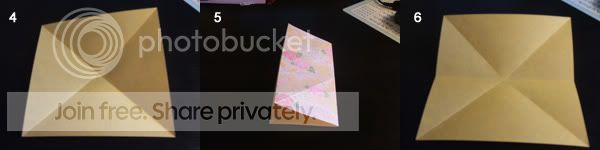
4. Repeat with the other diagonal and unfold it.
5. Fold the paper in half so that you create a 2x1 rectangle. Be sure to keep your folds neat - this crease should line up exactly with the intersection of the previous two creases you made.
6. Unfold the paper. Note the intersection of creases.

User Image

7. Repeat for the fourth crease.
8. Fold your paper in half again and hold it with the open end up.
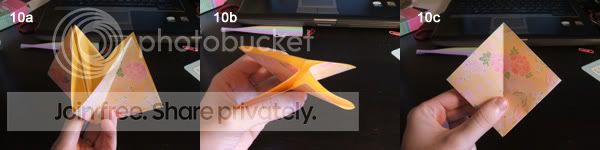
9. Grab the bottom corners of the paper and slowly push them towards one another. A pocket in the middle of the paper should form. If this step is difficult for you, it's probably because you haven't creased your paper strongly enough - go back and reinforce your creases again.

User Image

10a. Closing the gap from step 9...
10b. This is what the result of step 9 looks like from the top. These are the open ends - it is important that you note where they are.
10c. Making sure the paper is flattened, hold the diamond you just made with the open ends pointing down.

User Image

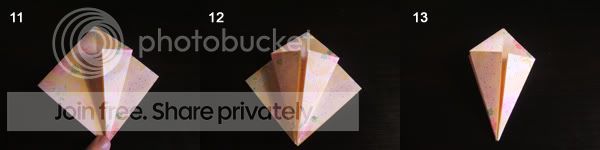
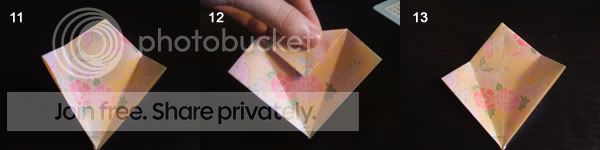
11. With the open ends of your diamond still pointing down, grab one of the side corners of your diamond (only the top layer, not both layers). Fold the paper so that the edge between the side corner you chose and the bottom corner lines up with the center crease.
12. Do the same for the other corner.
13. Flip the paper over and do the same for both of those corners as well.

(These next few steps are misnumbered because I wasn't paying attention when I made the diagrams. Sorry. x_x wink

User Image

11. This step is something I personally like to do to prevent me from accidentally crinkling my edges, but it isn't necessary. Unfold the folds you just made on one side so that you see the diamond shape again.
12. Fold the top of the diamond down. This crease should create a triangle shape with the other two creases you just made. Be sure to reinforce the this fold with your nail or some other hard object.
13. Unfold the fold you just made to get back to the diamond shape. Note that the creases look like an isosceles triangle.

User Image

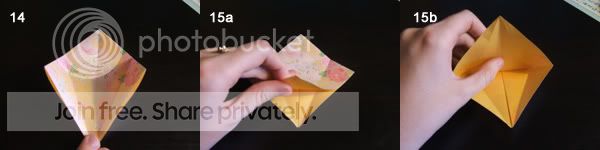
14. Flip over the paper and do the same thing do the other side, bending the top of the diamond in the opposite way you did before.
15a. Grab the bottom corner of the diamond (top layer only). Begin slowly bringing the corner up above the top of the diamond. This step is probably the most difficult one and what I see beginners getting tripped up on most often, so I've included lots of pictures.
15b. Continue to carefully pull up on the corner you grabbed. When the corner is nearly vertical, the sides of the of the diamond will start puckering in. This is what you want.

User Image

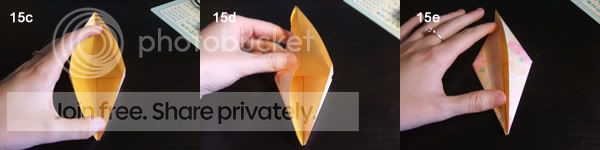
15c. More noticeable puckering of the edges. Note that the center of this fold is the crease you made and reinforced in steps 12-14.
15d. Start folding in the edges of the diamond, allowing them to naturally follow the creases that you made before. Keep bringing that corner to the top.
15e. Begin flattening out the shape. Notice how the point that was once on the bottom is now higher than the top of the diamond.

User Image

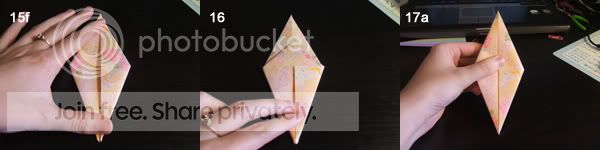
15f. The finished result, all flattened out.
16. Flip the paper over, and...
17a. ...Do the same thing to the other side! Yay! This is the finished result.

User Image

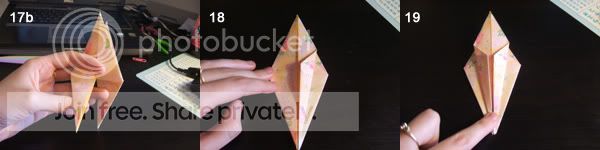
17b. Note how your new shape has little "legs." Keep these at the bottom, pointing towards you.
18. In a manner similar to step 11, you'll want to grab one of the side corners (top layer only) and fold it so that its edge lines up with the center crease of the new diamond.
19. Do the same thing for the other side.

User Image

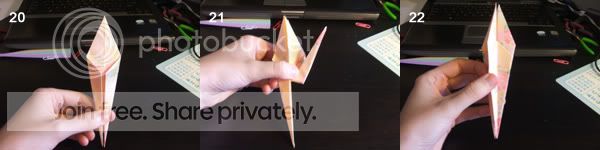
20. Flip over and do the same for the two corners on the other side.
21. Grab one of the legs and bend it upwards at an angle. Unfold it and bend it in the other direction. Unfold again.
22. Open the little pocket between the first and second layers of the leg.

User Image

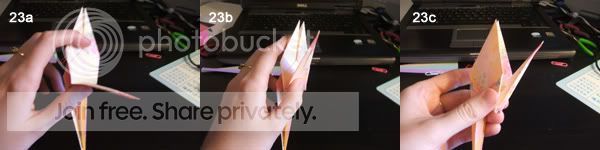
23a. This step is called a reverse fold. Gently push up on the leg, making sure it bends at the creases that you just made.
23b. Keep bringing it up...
23c. As you get closer and closer to the final position of the leg, the layers on either side of it will begin to close around the leg. This is what you want - help out the paper a little bit if it's not doing it on its own.

User Image

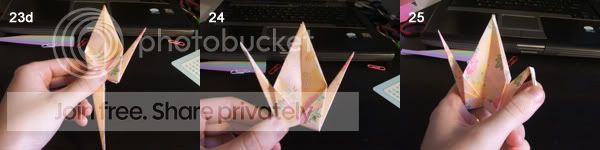
23d. Flatten the paper as much as you can. Tadah!
24. Do the same thing for the other leg.
25. Select one of the legs (I usually go for the one that looks worse) to become the head of your crane. Crease it in the same manner as you did before in step 21.

User Image

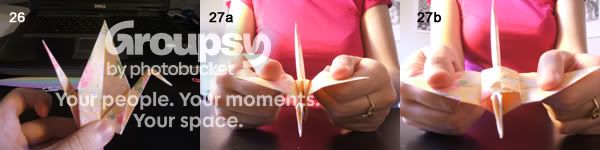
26. Reverse fold along the crease you just made, just like in step 23.
27a. Grab the tips of your crane's wings...
27b. ...and slowly pull them out and away from one another. The center should puff out. (I think it looks like a little cushion. :3)

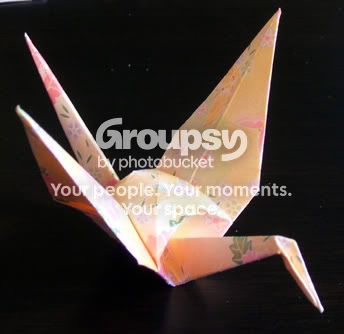
You're finished! Congratulations on making a paper crane!

User Image

Iyou
Captain


SubtleAnarchy

PostPosted: Mon Dec 10, 2007 7:29 pm


The traditional crane is one of my all-time favorite models. Because it's easy, but also because it's very elegant. :3

I guess it's not the crane, but it can be made from the bird base that you use to create the crane: the Flapping Bird? I think this is the one that most kids learn in elementary school, probably because it's more interactive than just the crane. rolleyes

Anyway. I can't wait to finish my 1,000 cranes. (:
PostPosted: Tue Dec 18, 2007 8:23 pm


so hard emo

dud23 clone 2


dud23 clone 2

PostPosted: Tue Dec 18, 2007 9:15 pm


i cant so it im stuck on 15 emo
PostPosted: Wed Dec 19, 2007 9:02 am


dud23
i cant so it im stuck on 15 emo


When I first did the crane, that's what I got stuck on, too.

As long as you folded everything right, it should just kind of slide in to place.

Here's a video for how to fold the crane, maybe it will make more sense in real time? Once you see what's being done, you'll get it. (:

SubtleAnarchy


dud23 clone 2

PostPosted: Wed Dec 19, 2007 4:31 pm


TANK biggrin i do it biggrin
Reply
The Origami Guild

 
Manage Your Items
Other Stuff
Get GCash
Offers
Get Items
More Items
Where Everyone Hangs Out
Other Community Areas
Virtual Spaces
Fun Stuff
Gaia's Games
Mini-Games
//
//

// //

Have an account? Login Now!

//
//