|
|
|
|
|
|
|
|
|
 Posted: Fri Apr 06, 2007 6:03 pm Posted: Fri Apr 06, 2007 6:03 pm
Ziekara's Cosplay Progress Diary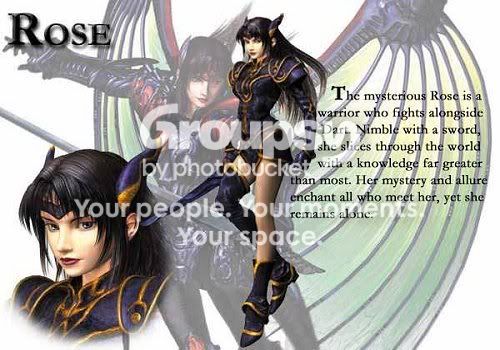 Well Catz had a cosplay thread so I figured I should be allowed to have one too 3nodding Basically, I'm working on my costume of Rose from the game Legend of Dragoon, and I feel like sharing my progress along the way, as well as hopefully getting some comments and critique. Please feel free to post what you think! I want to know heart
|
 |
|
|
|
|
|
|
|
|
|
|
|
|
|
Posted: Fri Apr 06, 2007 6:06 pm
How I Did It I finished the first part of my costume today. The headband with the horns is finally done! It took so much creativity to figure out how to do this. The headband itself is made out of craft foam that I cut, molded, lined and then added the decrative part in front just using a ballpoint pen to indent it. It was painted, and then I attached elastic to the back to connect the two ends and make it easy to get on and off while at the same time holding it firmly in place.
I had no idea how to go about making the horns and attaching them well to the headband, but lucky me, they sell styrofoam cones at Hoby Loby (I'm a sucker for styrofoam)! I cut them in half, sanded them into shape, covered them in 3 layers of styrofoam paint, sealed them, and painted them. When it came time to add the gold, I wasn't sure what to do for that. After screwing up the shoulder armor with the fabric paint, I didn't really want to go down that path again. I decided to buy metalic gold spraypaint, but making the pattern wasn't working. I had to block the rest of it so I didn't spray the whole thing gold. I used wax paper and was going to do the pattern that way, but when I cut out the peice from the middle, I could tell it wasn't going to work...however the piece I had cut out looked perfect LOL. So, I spray-painted THAT part gold, and glued it onto the horns XD you'd never guess that gold is actually wax paper just glued onto them. It looks and feels like gold leaf, but only cost a few cents instead of a many dollars.
Finally, I antiqued the whole thing with paint to make it look a little more old and worn in. Once it was dry (and after sealing it of course) I used E6000 to glue them onto the headband. I wish I had made them angled slightly more, but it's still good. I love my headband. heart
The only real problem with them is that they are directly over my ears and so they squish my ears a bit. It's somewhat noticible now, but I'll have a wig eventually and that should cover up my ears anyway so I don't think it will matter in the long run.
Pictures
The Headband!Close up detail in frontFrom the side to better view the hornsThe OTHER sideNow the fun part...how it looks on me!And from the side...
Please let me know what you think so far. I want some comments very badly mrgreen
|
|
|
|
|
|
|
|
|
|
|
|
|
|
|
|
|
|
Posted: Sat Apr 07, 2007 10:23 pm
OMG!
Soo Freaken aWsome@!!
I love it!
You are just so creative!
Seriously amazing!
3nodding heart
|
|
|
|
|
|
|
|
|
|
|
|
|
|
|
Posted: Sat Apr 07, 2007 10:24 pm
Serioulsy, looks just like the charactors horns!
Amazing!
|
|
|
|
|
|
|
|
|
|
|
|
|
|
|
|
|
|
Posted: Mon Apr 09, 2007 10:54 pm
Aww, thank you! That means so much 4laugh
I'm working on the shoulder armor now. It's comming out really good so far. As soon as it's done, I'll post pictures!
|
|
|
|
|
|
|
|
|
|
|
|
|
|
|
Posted: Tue Apr 10, 2007 11:35 am
I can't wait!
I unfortunatly haven't had much time to work on mine.
|
|
|
|
|
|
|
|
|
|
|
|
|
|
|
|
|
|
Posted: Tue Apr 10, 2007 1:10 pm
wow nice work, its coming along really well!
|
|
|
|
|
|
|
|
|
|
|
|
|
|
|
Posted: Thu Apr 19, 2007 12:13 am
It's shoulder armor time!!How I Did It
The shoulder armor was made with a technique using craft foam that I got from Here.
Once the basic armor was done, I had to figure out how to do the gold edging and the buttons. The buttons were the easier of the two. I got those little googly craft eyes and just painted them gold and purple then glued them on xd The edging was a little trickier, but luck came to me when I found an old leather belt that didn't fit anymore. It was braided with strands of leather, so I took the strands apart, spray-painted them gold and *poof* I had awesome shoulder armor. I'm a master at taking random objects and turning them into useful cosplay items 3nodding Pictures Foam pieces cut out and ready to goPainted and gluing the gold leatherAlmost done, just need the buttons!Complete!Close-up for detailOn me! biggrin
I only have the one done so far. The right side still needs the gold trim and the buttons, but the basic structure is done. I figure since it should be identical, I wont have to post pictures of the second one.
And I still have no idea how I'm going to attach these to the actual costume, but I have an idea forming so we'll have to see how it works out.
|
|
|
|
|
|
|
|
|
|
|
|
|
|
|
|
|
|
Posted: Sat Apr 21, 2007 12:37 pm
Wow. That's really good. I really like how the shoulder plates turned out. It's going to be really good when it's finished.
A suggestion for putting it all together at the end: don't. The best thing to do would be to think of it as real armor... I believe that the best thing to do would be to strap the shoulder plates on to your shoulders, over the breastplate. I would also suggest making the bottom part at the hips separate from the rest, so that the top comes in three parts: shoulder plates, breastplate, and... hip plate? Then, the hip plate part would have to be big enough so that it stays on, but small enough so that it fits under the breastplate.
Also, there's this stuff called Model Magic that I've found very useful in my short cosplaying time. It's made by crayola, but it's very useful. It's kinda like play-doh, but it dries to a styrofoam consistancy, (which takes 24 hours). It comes in white, too, and is very acrylic paint-friendly. 3nodding
|
|
|
|
|
|
|
|
|
|
|
|
|
|
|
|
|
|






![[DarkDreams]'s avatar](https://a1cdn.gaiaonline.com/dress-up/avatar/ava/aa/7f/28e1d9f7337faa_flip.png?t=1361197778_6.00_01)